RedlineOSP — User Manual
Field markups, quantities and invoicing for outside-plant crews.
This manual covers the whole product: the map and markup tools a crew uses in the field, the inspection and review steps, and the office side — codes, time, invoices and publishing to the customer. It is written for the people who use the software day to day, so you can hand it to a new hire and let them work through it.
Every screen and label in this manual is taken from the live product, so the wording here matches what you will see on screen. Screenshots use a demonstration instance with synthetic data — no real jobs, addresses or customers appear anywhere in this document.
Want to try it first? A public demo is available at demo.redlineosp.com —
username demo, password demo123. It is a sandbox loaded with example work, and you
cannot break anything in it.
1. The big picture
RedlineOSP carries a job from the field to the invoice without retyping anything.
The flow:
- A project is created and its plan sheets (PDF drawings) are uploaded.
- The crew marks up the sheets in the browser on a phone or tablet — lines, arrows, pins,
highlights, notes and photos, right on the drawing.
- Work is inspected. Marks start as reported and become inspected once someone confirms
them.
- Quantities become money. Each mark can carry a billing code, a quantity and a rate.
- The office turns the inspected work into an invoice — a draft you review, then issue.
- The customer sees what you publish — released documents and delivered invoices through
their own login.
Two rules are worth learning on day one, because they explain most of what you will see later:
- Only inspected (or ready) work with a quantity and a rate can be billed. A mark with no
code, or no rate, will never appear on an invoice.
- Form quantities do not bill work on their own. A form records what happened; the invoice is
built from inspected marks. (See §9.)
2. Signing in, and keeping it running
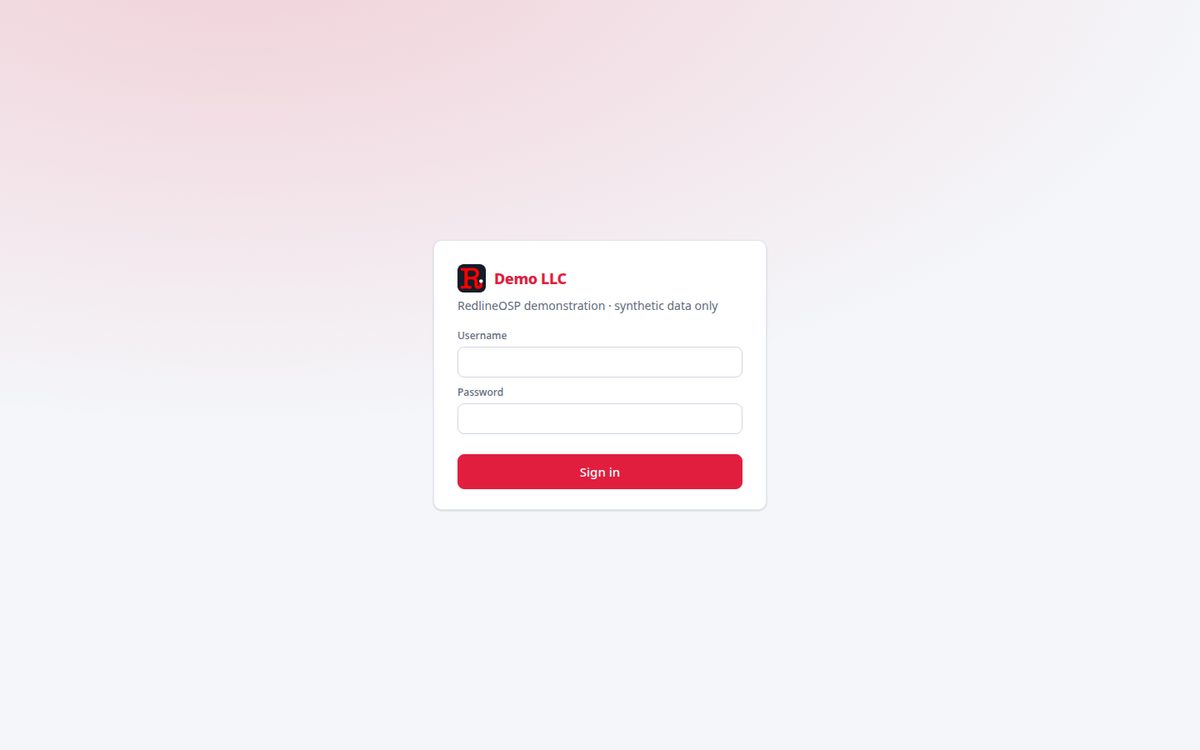
- Open your RedlineOSP address in any modern browser — Chrome, Safari, Edge or Firefox.
- Enter your Username and Password, then Sign in.
- Your company name appears at the top left. If it does not, you signed into the wrong
instance — check the address.
Sessions expire. If you are idle for a long time you may see "Session expired — sign in again". Nothing is lost; sign back in and your work is there.
Install it on your phone (do this before your first job)
RedlineOSP is a web app that installs like a native one — no app store, no updates to chase.
- iPhone / iPad (Safari): tap Share, then Add to Home Screen.
- Android (Chrome): tap the ⋮ menu, then Install app / Add to Home screen.
Open it from the new icon. It runs full screen, has its own icon, and loads faster on a weak signal because it caches the drawings you have already opened.
The sync indicator
The header shows a small status chip. It tells you the truth about your work:
- Synced (All changes saved) — the server has everything you have done.
- Syncing (Syncing queued changes) — changes are on their way. This is normal after being
offline.
- Offline (Offline — changes are saved on this device and sync when you're back online) —
you have lost signal. Keep working. Your marks and photos are saved on the device and sent when signal returns.
Read this before you rely on offline mode:
- Offline work needs you to have signed in online at least once on that device.
- Billing and exports require a connection. They are deliberately not queued — you cannot
raise an invoice from a dead zone.
- Changing a drawing's scale must be done online.
- The device copy is a cache, not a backup. Do not treat a phone as your archive.
- If the same mark is edited on two devices while both are offline, the later change wins. Think
before editing yesterday's work on a second device.
3. Who sees what
There are four roles. Your role decides which items appear in the top navigation.
- Field user — sees Projects and Field forms. Reports work on the projects assigned
to them. A field user can also be given inspection permission, which lets them inspect reported work (see §6).
- Manager — everything a field user has, plus Publishing, Billing, Time,
Rate card and Users. Runs the office side: codes, rates, invoices, time and accounts.
- Admin — the owner account. Manages deployments and branding on request. Not covered in this
manual, because it is not part of day-to-day use.
- Customer — sees only Published documents: the invoices and documents you deliberately
release to them (see §11). Customers can never see your marks, rates, reports or draft invoices.
Field users only see projects they are assigned to. Managers see every project. If a crew member says a job is missing, an assignment is what needs changing.
4. Projects and drawings
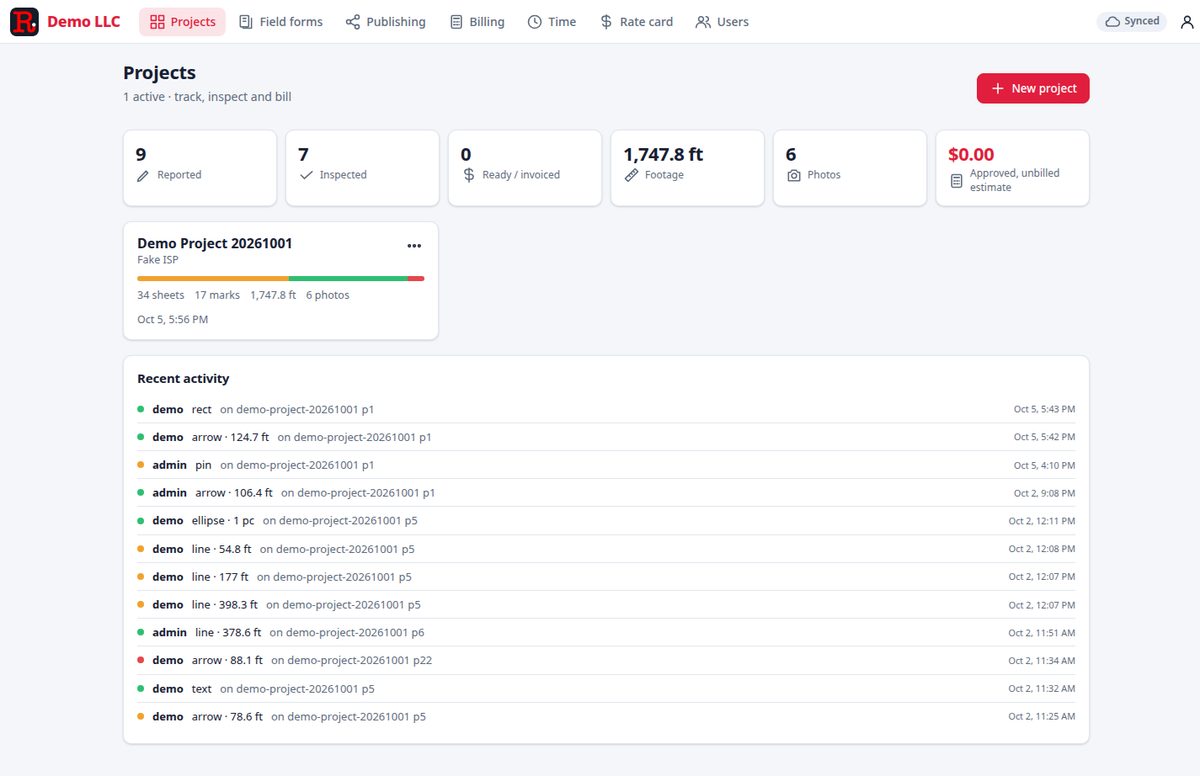
The Projects screen is home. Each project card shows its name, client, how many sheets and marks it has, total footage, photo count and when it last changed.
Across the top you get live totals for your work: Reported, Inspected, Ready / invoiced, Footage and Photos. Managers also see an Approved, unbilled estimate — the value of inspected work that has not been invoiced yet. That last number is the one to watch before month end.
Recent activity lists what changed and who changed it, including the mark type and quantity ("demo — arrow · 124.7 ft on sheet 1"). Use it to answer "did that get done?" without opening the drawing.
A New project button appears for managers. Projects that are finished show as archived and drop out of the active count.
Opening a drawing
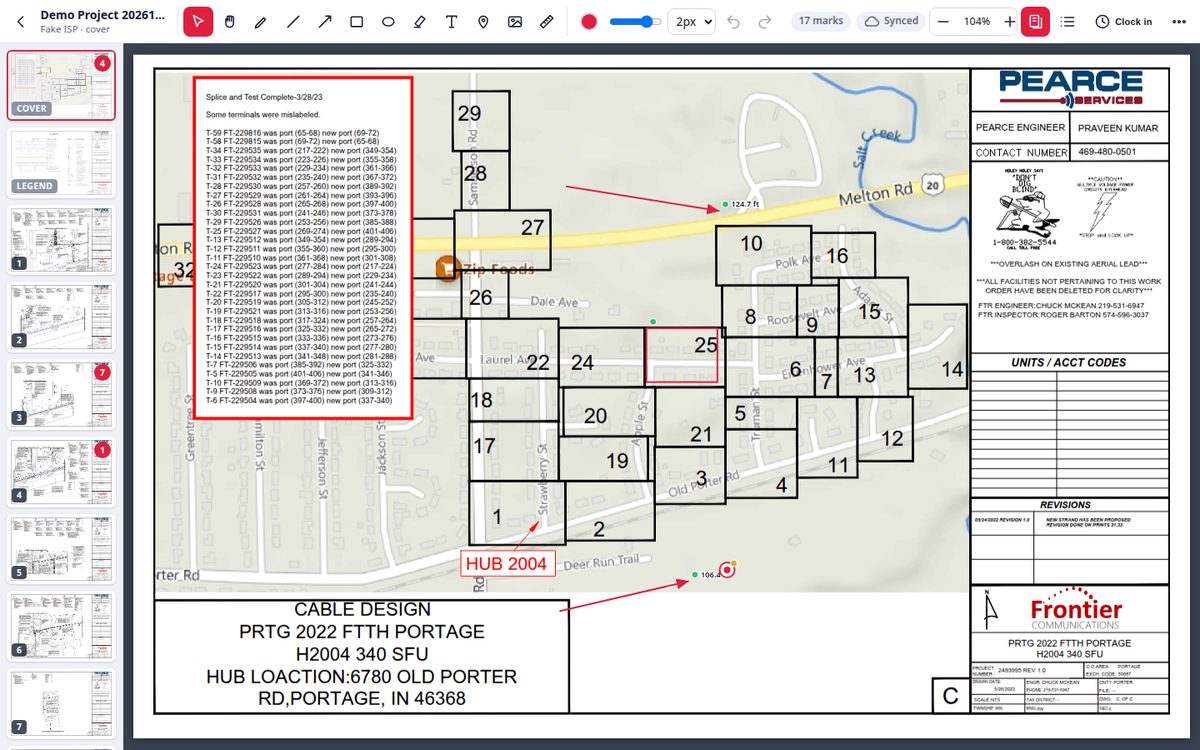
Tap a project to open the viewer. The header shows:
- the project name and client, with the current sheet ("cover", or a sheet number),
- sheet tabs across the top for fast switching between pages,
- the mark count on the project,
- the sync chip, and the zoom percentage.
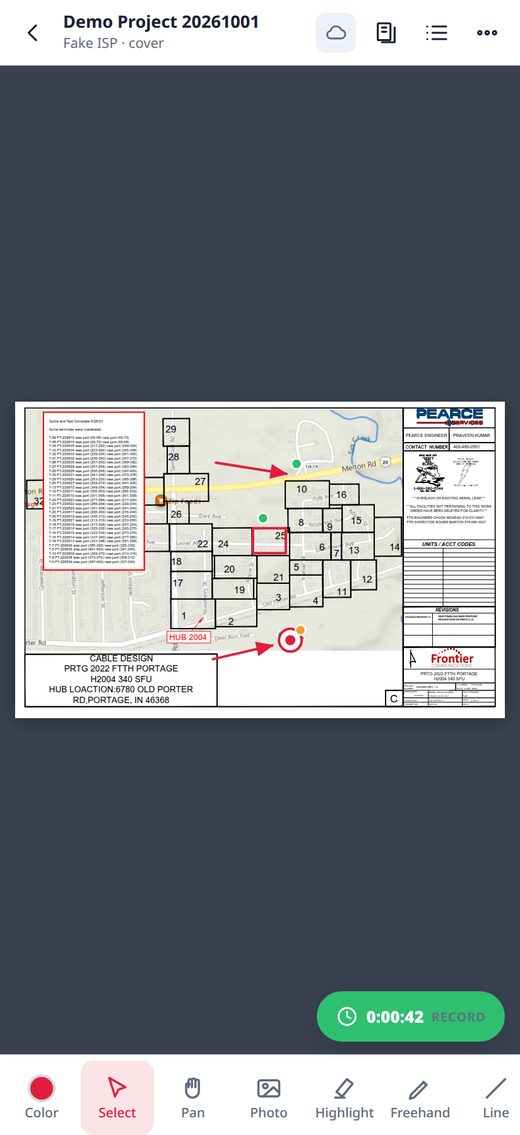
On a phone the sheets live behind Show sheets, which opens a thumbnail grid of every page — the quickest way to jump to sheet 22 without swiping through the set.
5. Marking up a drawing
This is the core of the product, and it is the part crews learn fastest.
The tools
| Tool | Shortcut | What it is for |
|---|---|---|
| Select | V | Tap a mark to edit it; drag empty space to pan |
| Pan | H | Move the drawing without changing anything |
| Freehand | P | Draw a line by hand when the route is not straight |
| Line | L | Straight measured run — gives you footage |
| Arrow | A | Directional run, e.g. a bore path — gives you footage |
| Box | R | Rectangular area of work |
| Oval | E | Round or elliptical area, e.g. a splice enclosure |
| Highlight | G | Mark up for attention — not billable |
| Text | T | Wording on the drawing, e.g. "FP moved 60'" |
| Pin | N | A single point — a handhole, a pole, a locate |
| Photo | C | Attach a photo to the drawing at that spot |
| Scale | M | Calibrate the sheet so distances are real |
On a phone the toolbar shows the tools you use most — Color, Select, Pan, Photo, Highlight, Freehand, Line, Arrow, Box, Oval, Text, Pin, Undo — with the rest behind the header buttons.
Drawing a measured run
- Pick Line (or Arrow, Freehand).
- Tap the start point on the drawing, then the end point. The mark appears and reports its
length — e.g. 124.7 ft.
- Choose Drawing color and an opacity if you want the mark to stand out.
- Pick a line width — 1, 2, 3, 4 or 6 px.
- Tap the mark with Select to give it details: status, a billing code, a quantity, a note,
and a photo if you have one.
The footage is measured from the drawing, not typed in. It comes from the path you draw and the sheet's scale, which is why calibrating a sheet (§4 and §7) matters — a wrong scale makes every number on that sheet wrong.
Highlights never bill. They are for communication. If you need to be paid for it, use a line, arrow, pin or box with a code.
Fixing a mark
- Undo (
Ctrl+Z) and Redo (Ctrl+Y) step through your recent changes. - To reshape a line, arrow or freehand path, select it and choose to edit the path, then drag
the handle points. Freehand paths and highlights have no handles until you turn path editing on — that catches everyone once.
- Zoom in / Zoom out for detail work. Show sheets jumps between pages.
- Mark list / inspect lists every mark on the project so you can find one without hunting for
it on the drawing.
Photos as evidence
Use the Photo tool, or attach an existing project photo from a form. Photos taken in the field are uploaded with the mark. On a weak signal the upload queues and retries, so a failed upload does not lose the photo — but confirm the sync chip says Synced before you leave a job.
6. Statuses: reported, inspected, and what that unlocks
Every mark carries a status, and the status decides whether the work can be invoiced.
- Reported — a crew member has marked the work. This is the normal state after fieldwork.
- Inspected — someone with inspection permission has confirmed the work. **This is what makes
it billable**, provided it also has a quantity and a rate.
- Ready / invoiced — the work has moved into billing or been invoiced.
Who can inspect: field users with the Allow inspections permission, plus managers. A user cannot sign off their own report — the inspection step exists to be a second pair of eyes.
Day to day, the cycle is:
- Crew marks work → status Reported. It appears in the Reported total.
- Whoever is inspecting opens the drawing (or Mark list / inspect), reviews the mark, and
confirms it → Inspected.
- The inspector can add an inspection note. The mark records who inspected it and when.
- Once inspected, it becomes a candidate for the next invoice.
Keeping this moving matters: uninspected work cannot be billed, so a backlog of Reported marks is money sitting still.
7. Billing codes and the rate card (managers)
A billing code is what turns a mark on a drawing into money. It carries a unit and a rate, so the system can work out what the work is worth.
Open Rate card. Codes can be company-wide or scoped to a single project — start company-wide for the work you do everywhere, and use a project code when a job has its own rate.
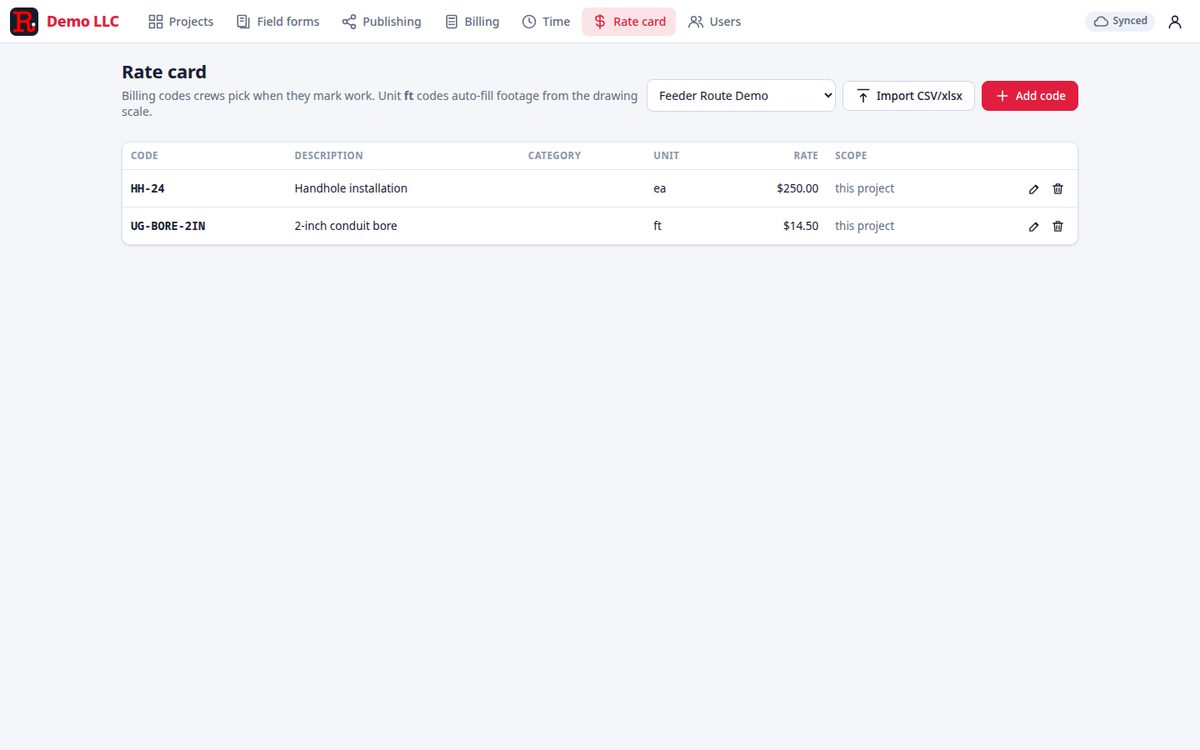
The columns are CODE, DESCRIPTION, CATEGORY, UNIT, RATE and SCOPE. The scope column tells you whether a code is company-wide or belongs to the project you have selected.
Adding codes: use Add code for one-offs, or Import CSV/xlsx for your existing rate sheet. The import expects the columns code, description, unit, rate, category.
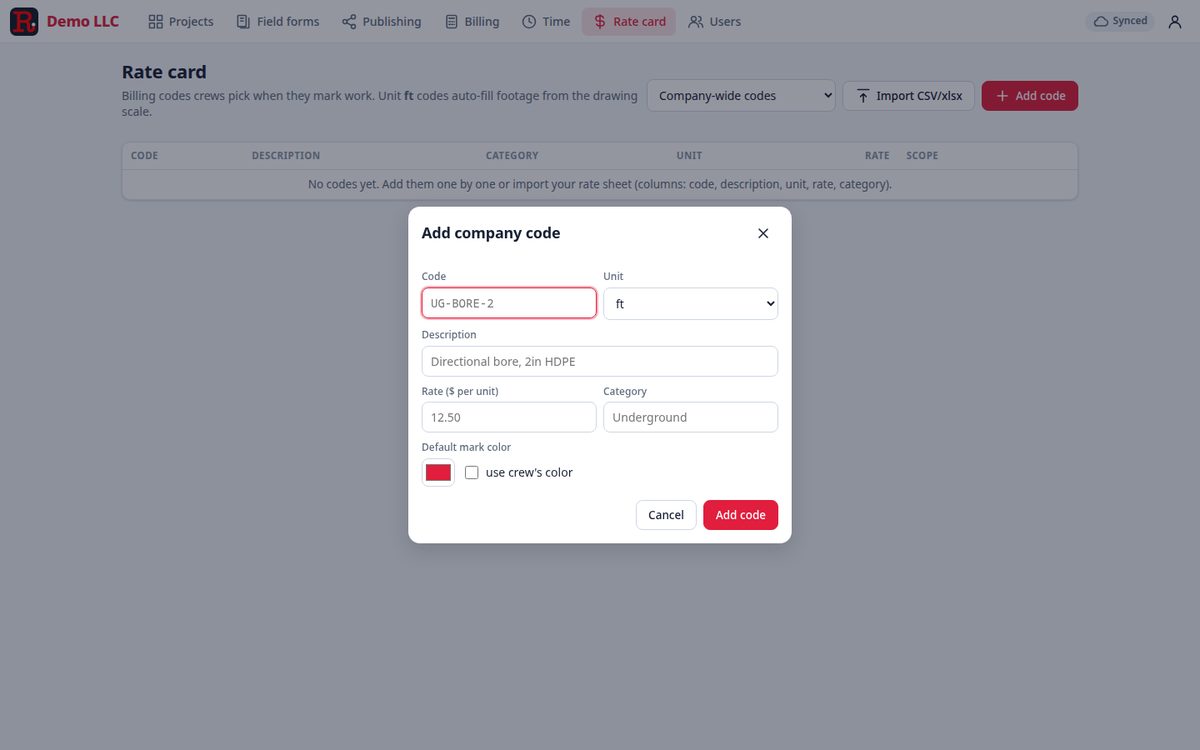
When you add a code you choose:
- Code and Description — as they should read on an invoice.
- Unit —
ft,ea,hr,lf,lotorday. - Rate ($ per unit).
- Category — for grouping.
- Default mark color — you can leave it as use crew's color.
A ft code is special: footage fills itself in from the drawing scale. Choose ft for trench, bore, cable and conduit and the quantity comes from the line the crew drew. Choose ea for handholes, pedestals and splices and somebody enters the count. If footage is coming out wrong, the code is fine — the sheet scale is wrong.
Why a mark does not appear on an invoice
The invoice screen states the rule plainly:
Only inspected/ready items with quantity and rate can be billed. Highlights are excluded.
So a mark is billable only when it is inspected, has a billing code, has a quantity, and the code has a rate. When work is not billable the draft screen tells you exactly what is missing, item by item — for example:
No billing code · 106.4 ft · sheet 1 — missing quantity/rate/code · No rate
Read that as a to-do list: assign a code, and set the rate on the code.
8. Working in the field
The practical version of everything above, for a phone in a truck.
Before you leave:
- Open the app and sign in while you still have signal — offline mode needs a prior online
login on that device.
- Open each drawing you will need and let it load, so it is cached.
- Check the sync chip reads Synced before you rely on any of it.
On site:
- Pick your project, pick the right sheet (use Show sheets).
- Check the scale is right for that sheet before you draw measured work (§4).
- Mark the work: Line / Arrow / Pin / Box / Oval, with a colour that stands out.
- Attach photos to the mark where evidence matters — before backfill, after backfill,
existing utility crossings.
- Set each mark's status and, where you know it, its billing code.
- Watch the chip. Offline means keep going; Syncing means it is catching up; Synced
means it is all safe.
If signal dies: keep working. Marks and photos are saved on the device and uploaded when you are back in coverage. Do not clear your browser data and do not uninstall the app until the chip says Synced — the queued work lives in that device's storage.
Before you leave the job: confirm Synced, then check the project's Recent activity shows what you did. That is your proof it landed.
9. Field forms
Forms record what happened on site — the paperwork that used to be on paper. Open Field forms.
**Draft on this device, submit for review, then export. Form quantities do not automatically
bill work.**
That second sentence is the one to remember: filling in a form does not raise a charge. The invoice is built from inspected marks (§11). Forms are the record; marks are the money.
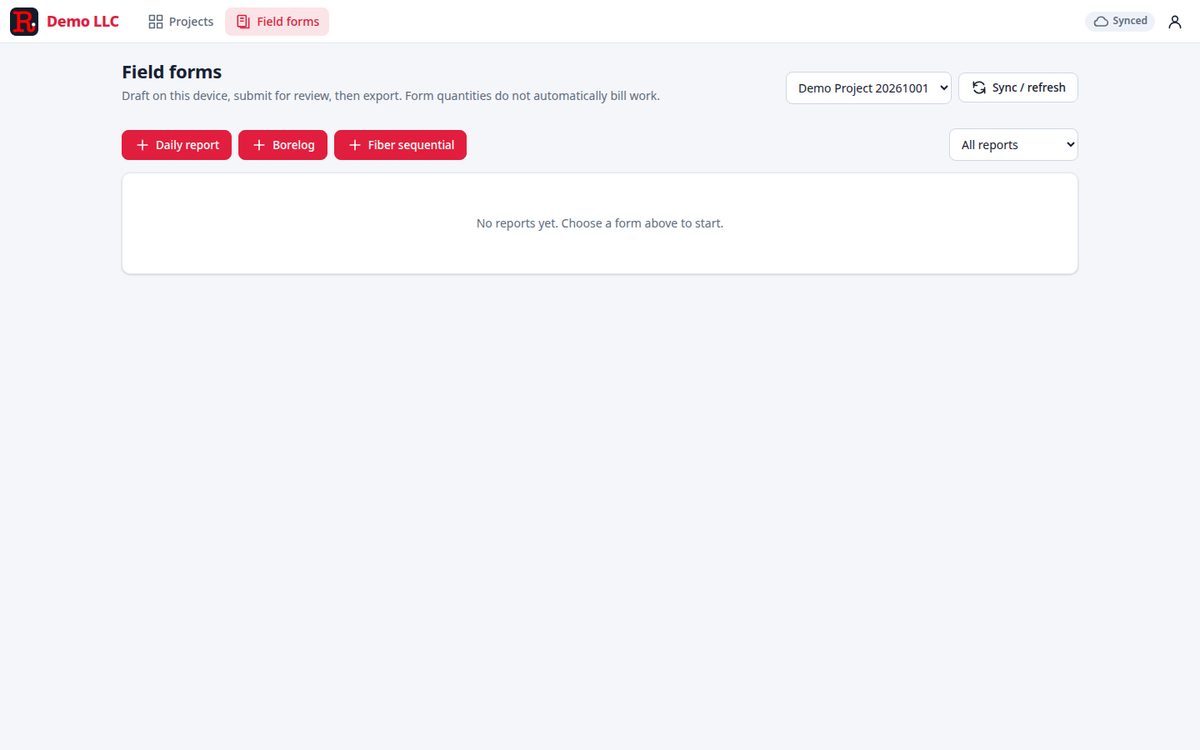
There are three forms, plus a list of everything you have written:
- Daily report — the day's labour and conditions.
- Borelog — a bore, station by station.
- Fiber sequential — sequential fiber installation.
- All reports — every form, filtered by status.
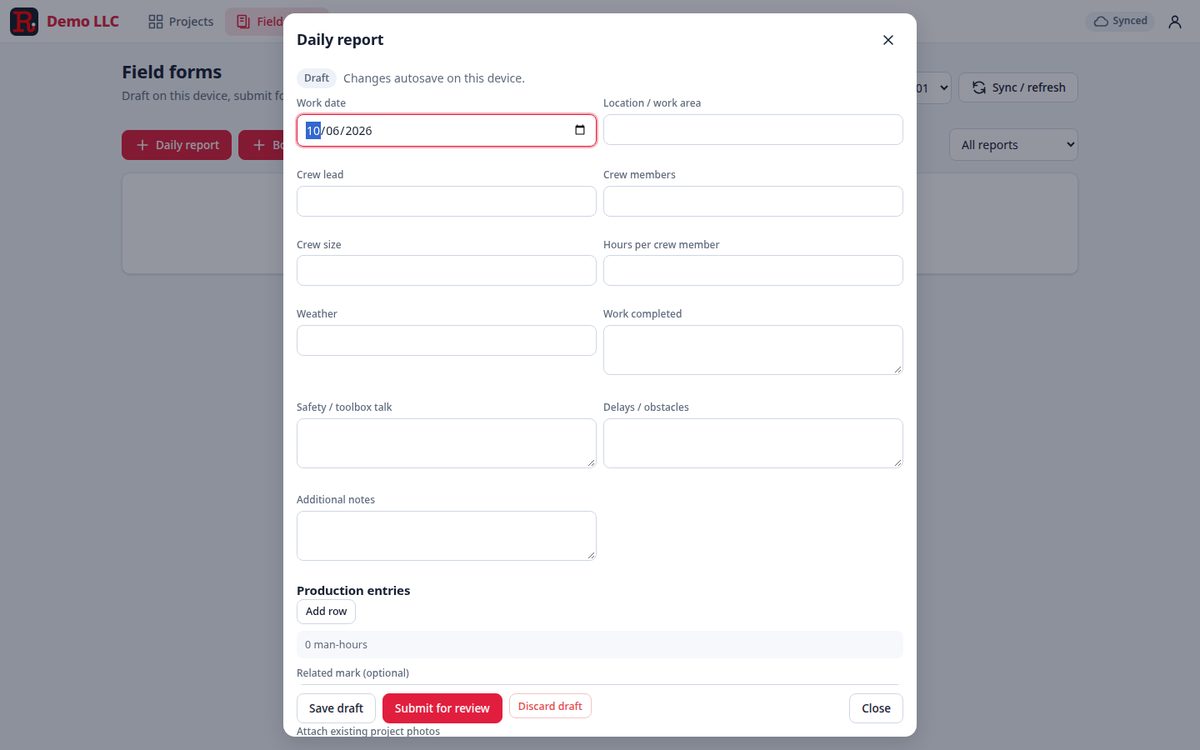
The Daily report
Fields: Work date, Location / work area, Crew lead, Crew members, Crew size, Hours per crew member, Weather, Work completed, Safety / toolbox talk, Delays / obstacles, Additional notes.
Then Production entries — add a row per item with man-hours — and optionally link the report to a Related mark on a sheet, so the paperwork points at the work it describes. You can also attach existing project photos.
Changes autosave on this device as you type, so a lost signal does not lose the form.
The footer buttons are Save draft, Submit for review and Discard draft.
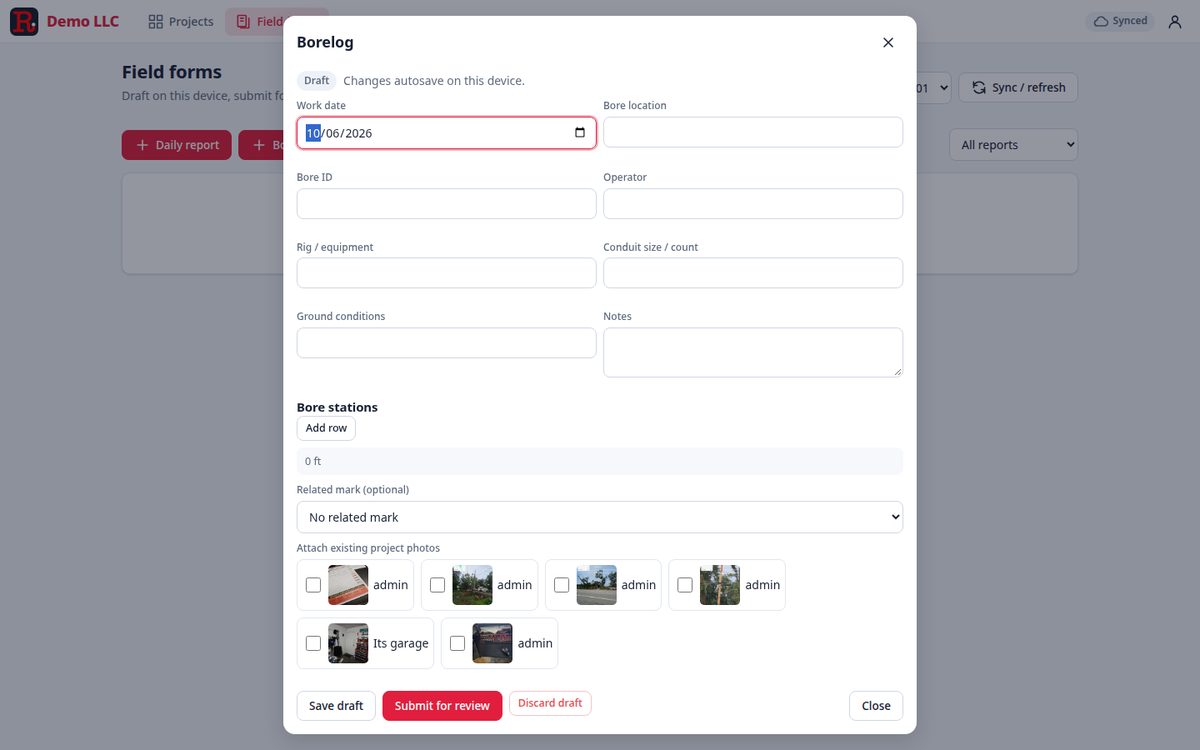
The Borelog
Fields: Work date, Bore location, Bore ID, Operator, Rig / equipment, Conduit size / count, Ground conditions, Notes, plus Bore stations (add a row per station) and an optional Related mark.
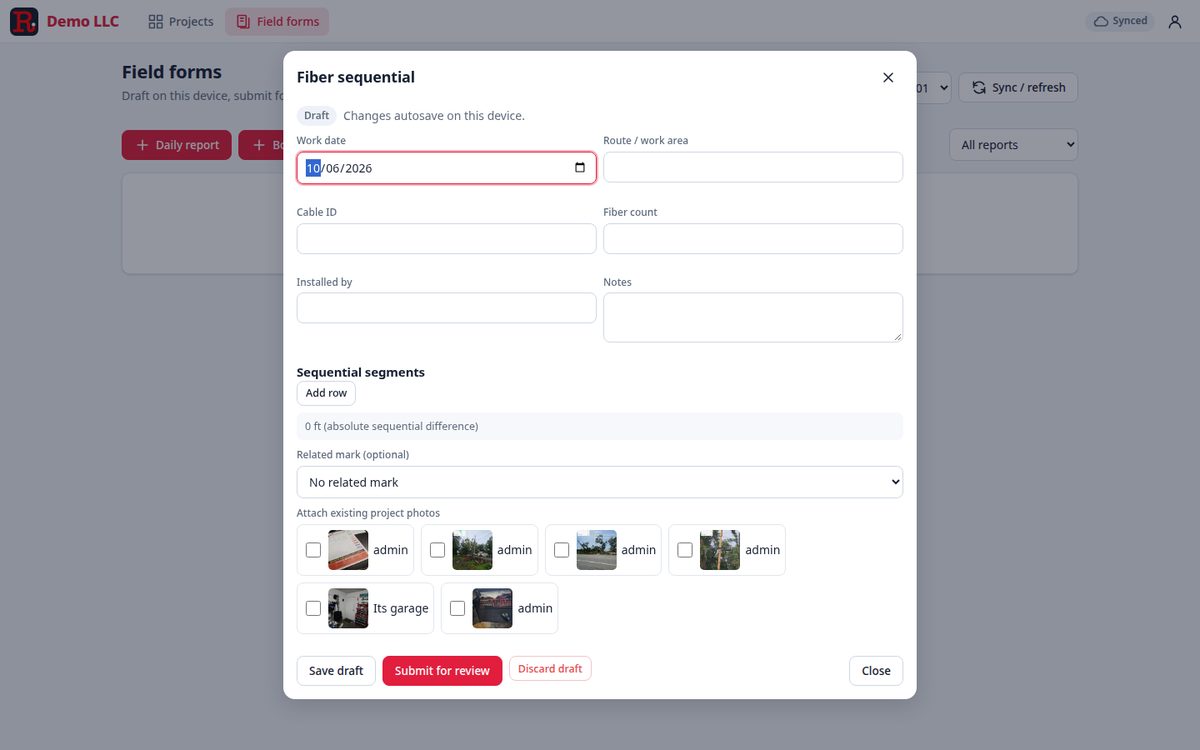
Fiber sequential
Fields: Work date, Route / work area, Cable ID, Fiber count, Installed by, Notes, plus Sequential segments — where each row shows the footage and the absolute sequential difference, so a gap or an overlap in the fiber count shows up immediately.
The states a form moves through
Draft → Submitted → Approved, or back as Needs correction.
- Draft — yours, private, still being written.
- Submitted — sent for review, and locked while it is being reviewed.
- Approved — accepted.
- Needs correction — sent back to you with comments; correct it and resubmit.
A form cannot be approved by the person who wrote it — the same second-pair-of-eyes rule that applies to inspecting marks.
10. Time clock
Time is tracked per project, from inside the drawing.
Clocking in and out
- Open the project's drawing. In the header press Clock in.
- The button becomes a running timer — 0:00:42 RECORD. Keep working.
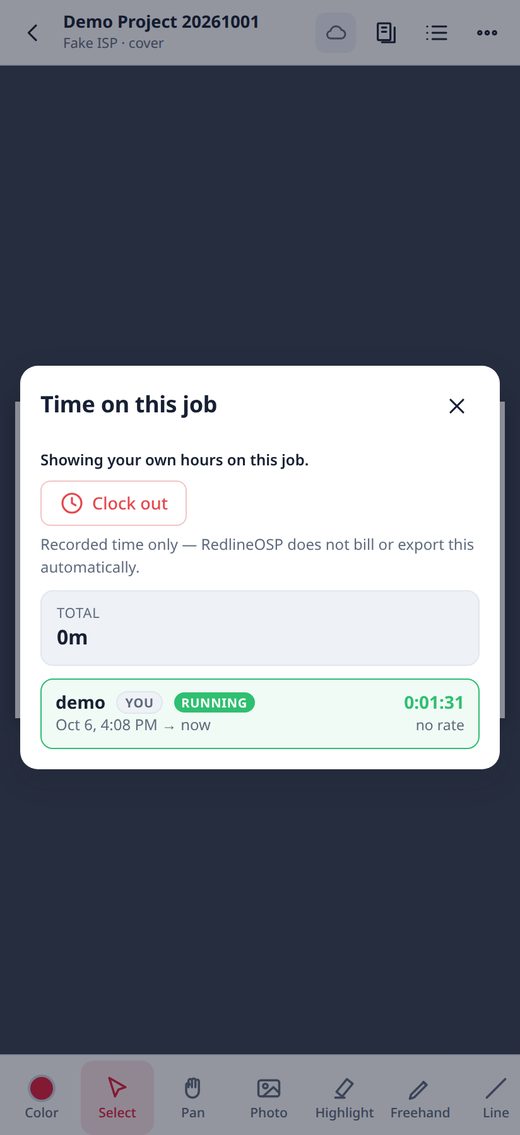
- To stop, tap the running timer. A panel opens: Time on this job, showing your own hours on
this project, with a Clock out button.
- Press Clock out. A confirmation asks you to confirm ("You have been on this job for
0:02:00") and offers an optional Note — use it for what changed, or which crew you were with.
- Confirm. You get a receipt: Clocked out — 2m on <project>.
Rules that surprise people:
- You can have one running clock at a time. Start work on another job and the first entry is
closed out — you cannot stack two timers.
- Time entries cannot be moved between projects. On the wrong job? Delete it and add a
correct one (managers can do this under Time).
- Only you and the managers can see your time. Crew hours are not on display to colleagues.
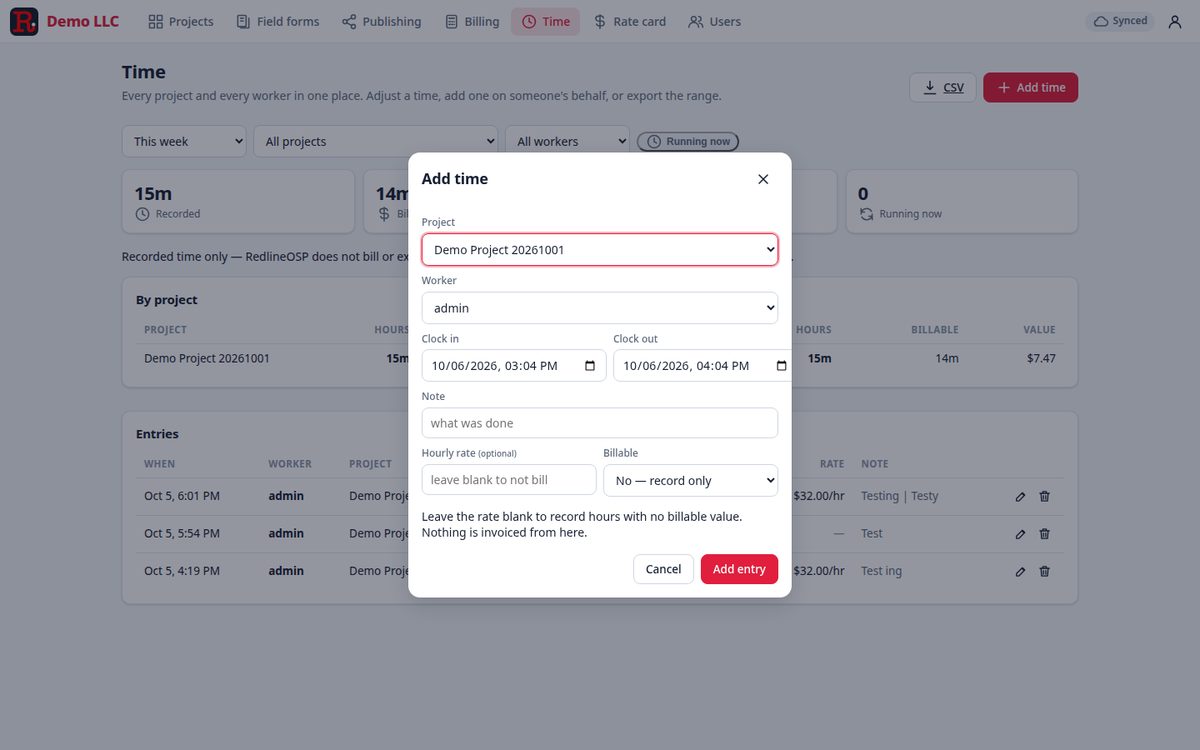
- Time is not money by default. The Time screen says it outright: *"Recorded time only —
RedlineOSP does not bill or export this automatically. Set a rate on an entry to give it a billable value."* Add a rate if you want to see a value against the hours.
- A clock-out of under a minute is accepted, so a mis-tap is not a problem.
The Time screen (managers)
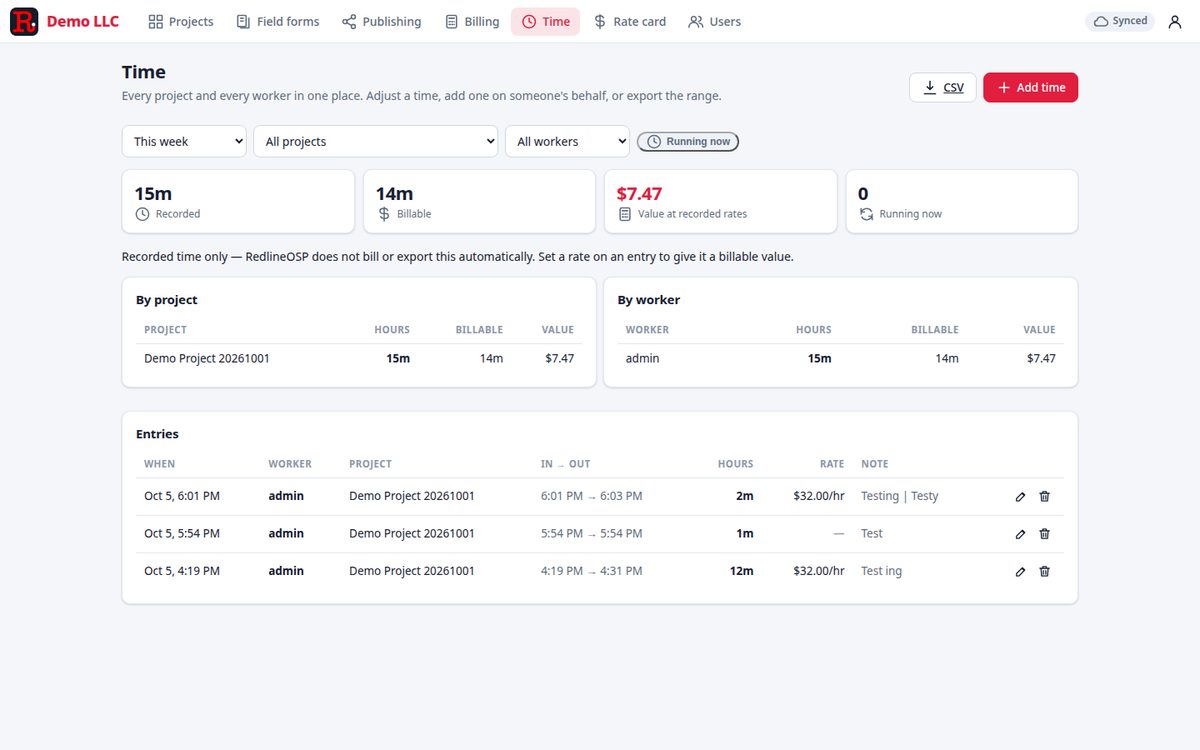
Everything in one place: every project and every worker. Filter by range — This week, Last 30 days, All time or a Custom… range — and by project and worker.
At a glance you get Running now, Recorded, Billable and Value at recorded rates, then breakdowns By project and By worker.
The entries table shows WHEN · WORKER · PROJECT · IN → OUT · HOURS · RATE · NOTE, with Edit entry and Delete entry on each row. Managers can also Add time on someone's behalf — for the crew member who forgot to clock out. CSV exports the range you are looking at.
11. Billing and invoices
**Approved work → reviewed draft → issued snapshot. Downloading an accounting file does not
import or pay an invoice.**
Three steps, in that order. Nothing is invoiced until a manager issues it.
Set up billing once
Open Billing → Billing settings and fill in the details that appear on your invoices: Legal company name, Address, Email, Phone, Payment terms, Invoice prefix (the sequence never resets) and Currency.
This is your legal invoice issuer, not product branding.
If you export to QuickBooks, read this: when sales tax is enabled in the destination account, Intuit's basic native invoice import is not available. PDF and detail exports still work. Do not turn off your real tax settings just to make an import work.
Customers
Under Billing → Customers, add each customer with Add customer. You will see QuickBooks exact name: not mapped until a customer's name matches exactly what your accounting package expects — that mapping is what keeps exports tidy.
Create the invoice
- Billing → Invoices → Create draft.
- Choose the Project and who to Bill to.
- Set the Invoice date, Due date, an optional PO / reference, Tax rate (%) and
Invoice notes.
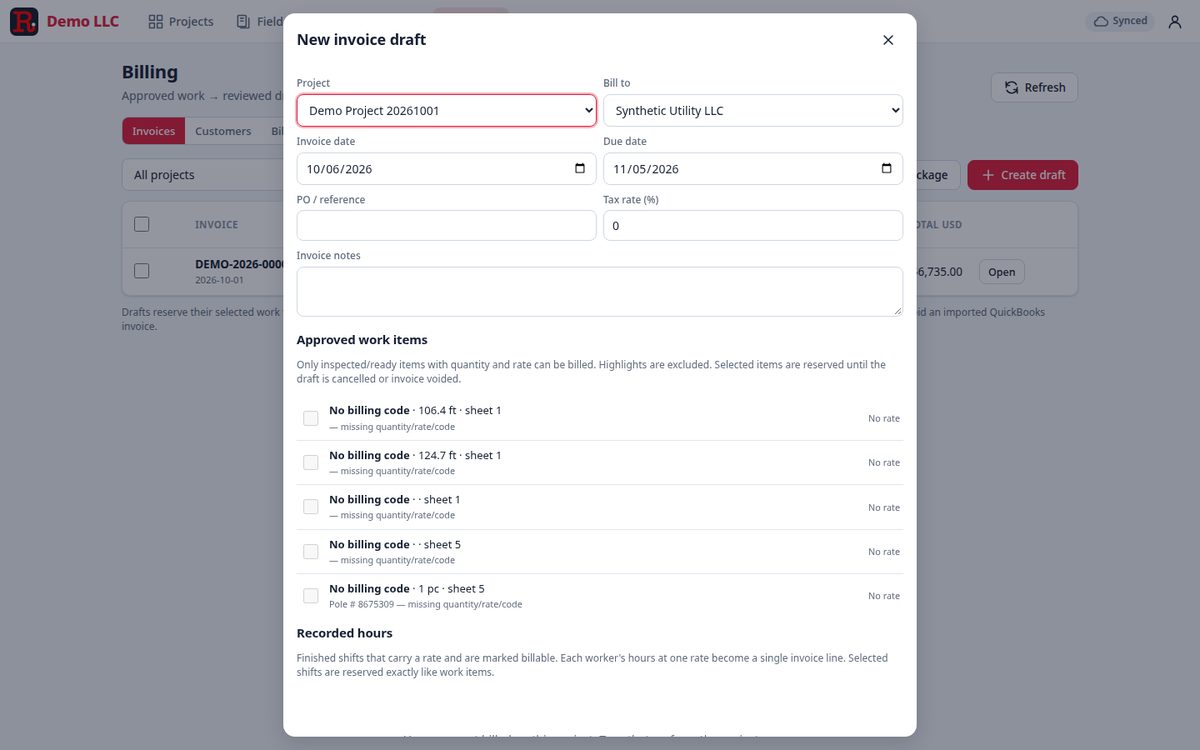
- Pick the work. The right-hand list shows what is available to bill:
Approved work items — *Only inspected/ready items with quantity and rate can be billed.
Highlights are excluded. Selected items are reserved until the draft is cancelled or invoice
voided.*
- Selecting an item reserves it. That is what stops the same work being invoiced twice, so
if a job is missing from the list, check whether it is sitting in another open draft.
- Cancel the draft to release reserved work, or continue to the review step.
Review, then issue
A draft is editable. Review it — dates, customer, tax, line items — then issue it.
Issuing freezes the invoice. Rates, quantities, customer and company details and branding are locked into an issued snapshot. That is deliberate: an issued invoice is a document you can hand to a customer or an accountant, and it must not change under them.
Only managers can issue invoices.
What an issued invoice contains
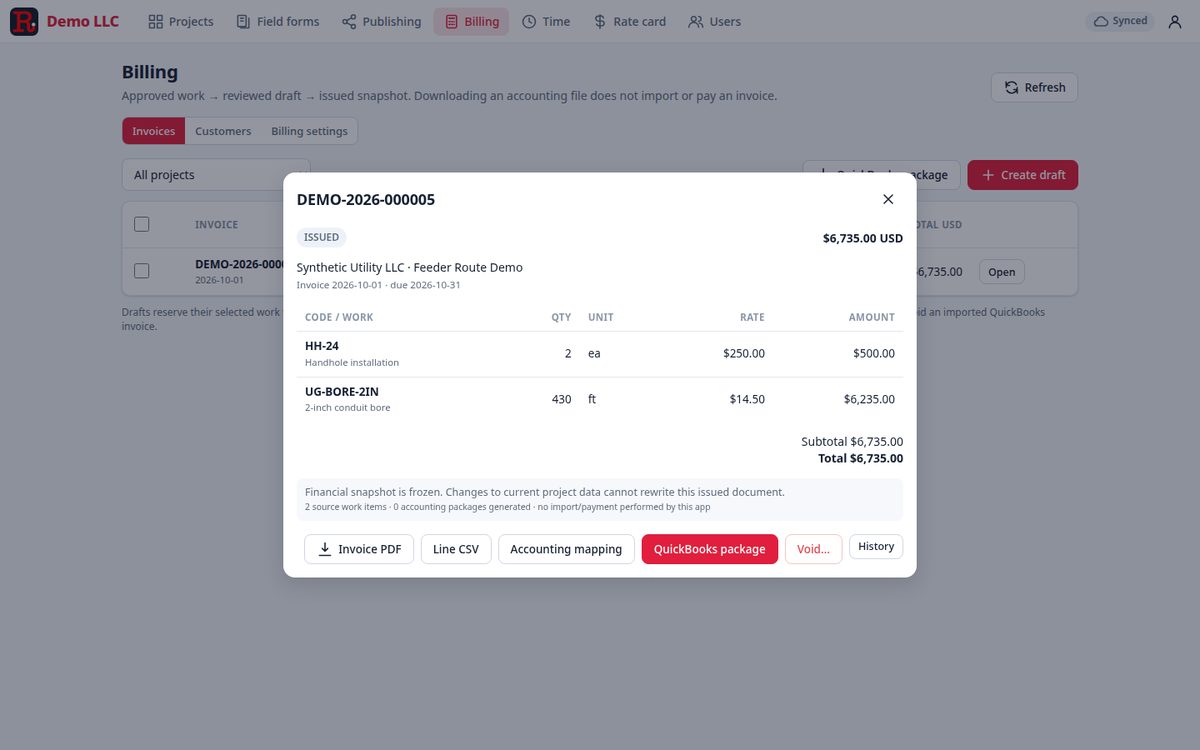
Each line shows the code, the work it represents, quantity, unit, rate and amount. The header carries the invoice number, its status (ISSUED), the total, the customer and project, and the invoice and due dates.
Voiding
If an invoice is wrong, void it with a reason. The original is kept and a void version is shown — you can demonstrate what was issued and that it was cancelled. Voiding here does not void the accounting entry in QuickBooks: if you have already exported it, deal with it there too. Voiding also takes down any publication that depended on that invoice (§12).
QuickBooks package
QuickBooks package builds the file you import into your accounting software. Remember the warning on the screen: downloading it does not import it, and importing it does not pay it.
12. Publishing documents to the customer
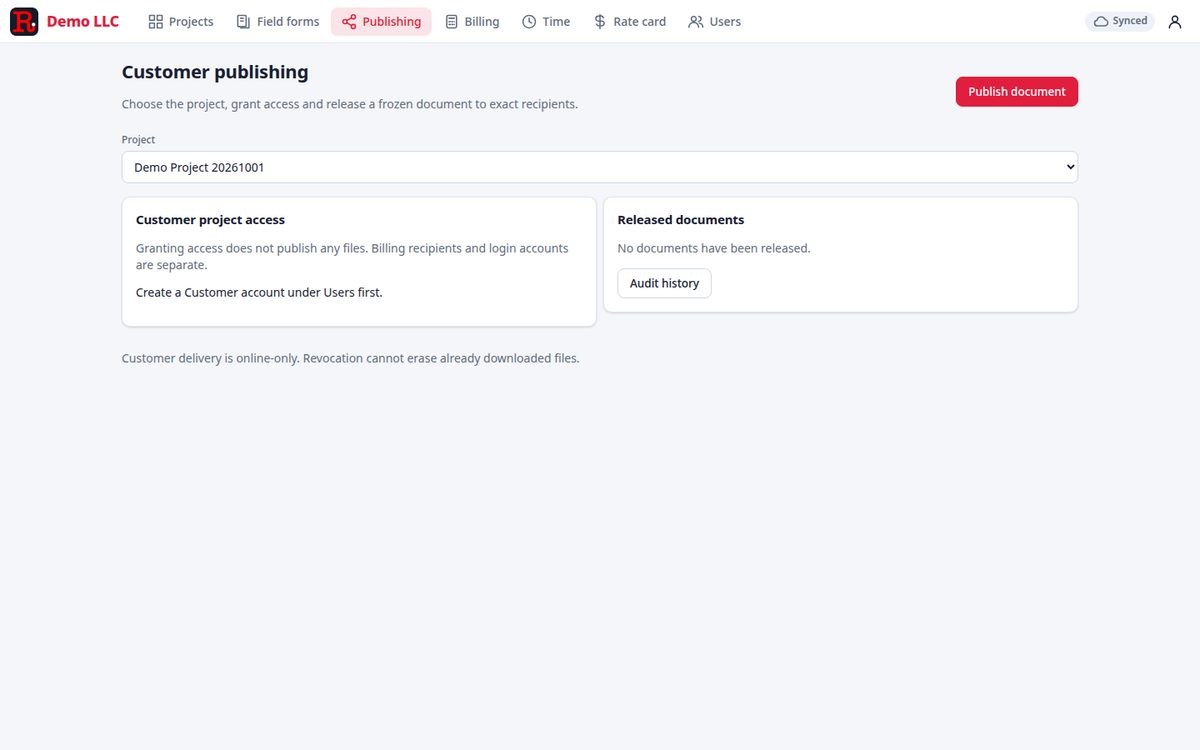
Choose the project, grant access and release a frozen document to exact recipients.
Publishing is how a customer sees anything at all. It is two separate acts, and both are needed:
- Grant access — granting access does not publish any files. This just decides that a
customer account may see a project. Billing recipients and login accounts are separate.
- Publish document — release a frozen document (an issued invoice, or reviewed photos) to
exact recipients.
Before you can publish to a customer you must create a Customer account — under Users. The screen says so directly: "Create a Customer account under Users first."
Released documents lists everything you have published — the title, state, who published it and when. Audit history records the decisions. A document you have withdrawn stays in the list, marked as withdrawn, with who withdrew it and when — the record of what was released is never erased, only the access to it.
Rules to know before you promise a customer anything:
- Customer delivery is online-only. There is no offline copy, and no emailed bundle.
- Revocation cannot erase already downloaded files. If a customer has downloaded a document,
withdrawing it stops future access — it does not reach into their computer.
- Documents are frozen at release: what the customer sees is what was published, not the
always-changing live data.
- Exports strip your internal notes, author metadata and captions. Customers see the document, not
your working.
- Voiding an issued invoice makes its publication unavailable.
13. Users and seats (managers)
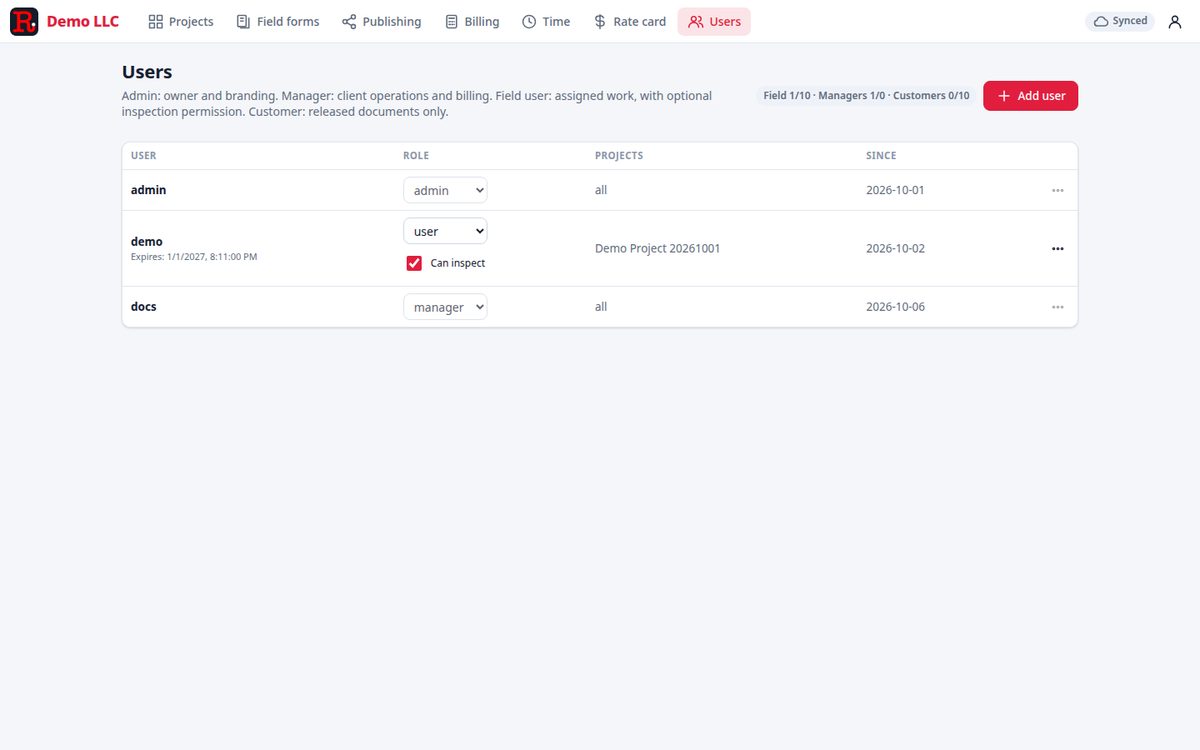
What each role is, in the product's own words:
- Admin — owner and branding.
- Manager — client operations and billing.
- Field user — assigned work, with optional inspection permission.
- Customer — released documents only.
The header shows your seat usage — for example Field 1/10 · Managers 1/0 · Customers 0/10.
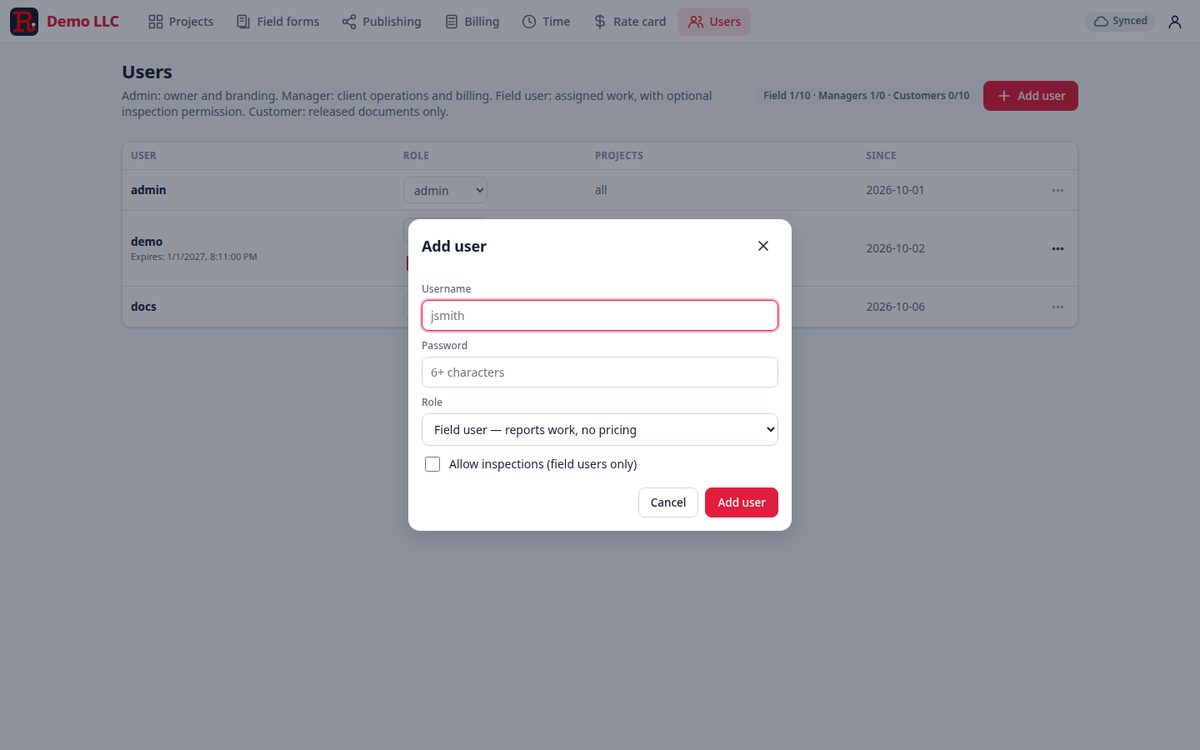
Adding someone: Add user → set Username and Password, choose the Role, and for field users tick Allow inspections if they are allowed to sign off reported work.
The table lists every account with USER · ROLE · PROJECTS · SINCE, plus whether a field user Can inspect and which projects they are assigned (all, a project name, or none assigned). Expiry dates, where set, are shown on the row.
Notes:
- A field user only sees assigned projects. Assign them from the project itself. A crew member
reporting a missing job almost always needs an assignment, not a new account.
- Lowering a seat limit does not disable people. If you reduce a plan's cap below current
usage, existing accounts keep working — you simply cannot add more until you are under the cap.
- Account expiries are checked at every sign-in, so an expired account is refused at the door.
- Give each person their own account. Shared logins destroy the audit trail — every mark and
time entry is stamped with the name that made it.
14. Troubleshooting and FAQ
My work is not showing up. Look at the sync chip. Offline or Syncing means it is on the device waiting to go. Get signal, leave the app open a moment, and confirm it reaches Synced. Then check the project's Recent activity.
A mark will not go on the invoice. It needs four things: inspected, a billing code, a quantity, and a rate on that code. The draft screen names what is missing per item. Also check the work is not already reserved inside another open draft.
The footage on my line is wrong. The number comes from the drawing, so the sheet scale is wrong, not the mark. Fixing the scale has to be done online.
I cannot see a project. If you are a field user, you are not assigned to it. Ask a manager to assign you. Managers see everything.
Billing, Time, Rate card or Users is missing from my navigation. Those screens are for the Manager role. Field users see Projects and Field forms.
"Session expired — sign in again." You were idle too long. Sign back in; nothing is lost.
A photo upload failed. That is expected on a weak signal — the upload queues and retries. Keep the app open until the chip reads Synced and never clear browser data before it does.
The freehand line has no handles to drag. Freehand paths and highlights start without handles. Select the mark and switch path editing on, then drag the points.
Clock in is not there / my clock vanished. One running clock per person. Starting on another job closes the first entry.
I clocked into the wrong project. Time cannot be moved between projects. Delete the entry (Time → Delete entry, managers) and add a correct one.
Nothing appeared in QuickBooks after I downloaded the package. Downloading is not importing. Take the file into your accounting software yourself. If sales tax is enabled there, the basic native import is unavailable — use the PDF/detail export.
The customer says they cannot see the document. Check three things: they have a Customer account; access was granted to that project; and a document was actually published. Granting access alone releases nothing.
I withdrew a document but the customer still has it. Revocation stops future access; it cannot erase a copy already downloaded.
A form was sent back. It is in Needs correction — open it, fix what the reviewer flagged, and Submit for review again.
15. Glossary
- Archive — a finished project, hidden from the active list.
- Billing code — the code, unit and rate that make work billable.
- Borelog — a form recording a bore, station by station.
- Draft (invoice) — an editable invoice that reserves the work it contains.
- Draft (form) — a form still being written on the device.
- Footage — length measured from the drawing using the sheet's scale.
- Highlight — a markup for attention. Never billable.
- Inspect — confirming reported work so it can be billed.
- Issue — freezing an invoice and making it final.
- Mark — anything drawn on a sheet: line, arrow, box, oval, pin, text, highlight or photo.
- Publication — a frozen document released to named recipients.
- Rate card — where billing codes and rates are kept.
- Related mark — the drawing mark a form refers to.
- Scale — the calibration of a sheet, so the system knows what a drawn distance means.
- Sheet — one page of a plan set.
- Status — Reported, Inspected, or Ready / invoiced.
- Sync chip — the indicator showing whether your work has reached the server.
- Void — cancelling an issued invoice while keeping the record.
16. Quick-start cards
For a new crew member, first day
- Install the app from your phone's browser — Add to Home Screen / Install app.
- Sign in with the account you were given. Use your own account, never someone else's.
- Open your project and let the drawings load while you have signal.
- Check the scale on the sheet you are about to mark.
- Draw your work — Line for runs, Pin for points — then tap each mark to set its status,
code and quantity.
- Take photos as evidence as you go.
- Watch the chip: Synced before you leave the job.
- Clock in when you start, Clock out when you finish — with a note.
For an inspector
- Filter the project to Reported work — the dashboard total tells you how much is waiting.
- Open each mark, check it against what you can see and what the crew photographed.
- Confirm it → Inspected, and add an inspection note when it is not obvious.
- Send anything questionable back with a form in Needs correction, or flag it on the mark.
- Keep the Reported figure low: uninspected work cannot be billed.
For the office, invoice day
- Check Recent activity and the Ready / invoiced and Approved, unbilled estimate
figures — that is unbilled money.
- Make sure every mark you intend to bill is inspected and carries a code with a rate.
- Billing → Create draft, choose the project and customer, and select the approved work.
- Review it: dates, tax, line items. Fix anything flagged as missing quantity/rate/code.
- Issue it (managers only). Void and reissue if it is wrong.
- Export the QuickBooks package and import it in your accounting software.
- Publish the issued invoice to the customer — grant access and publish the document.
For a customer
- Sign in with the account your contractor created for you.
- Published documents lists everything released to you: invoices and reviewed photos.
- Open a document to view it. Downloads are yours to keep.
- You will not see internal notes, rates or working data — only what was published to you.
- Need something else? Ask your contractor to publish it; there is nothing to configure on your
side.
RedlineOSP — field markups, quantities and invoicing for outside-plant crews.